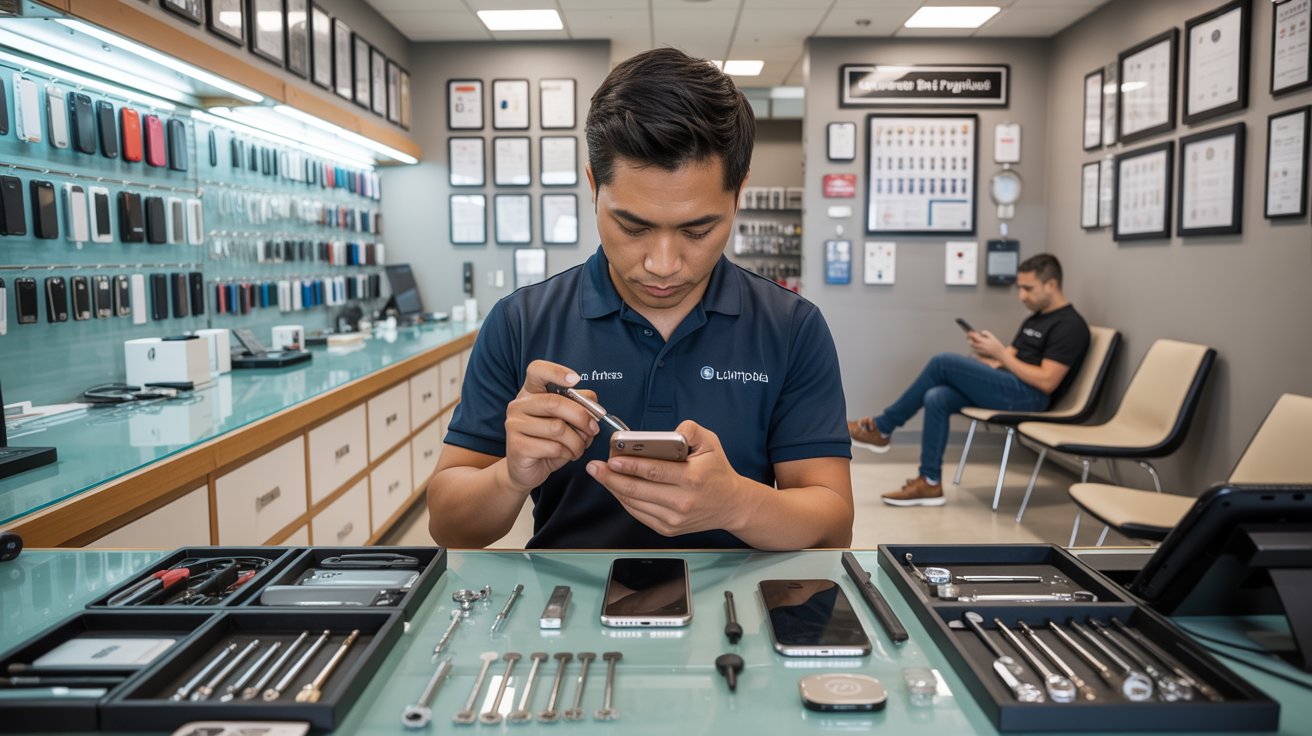
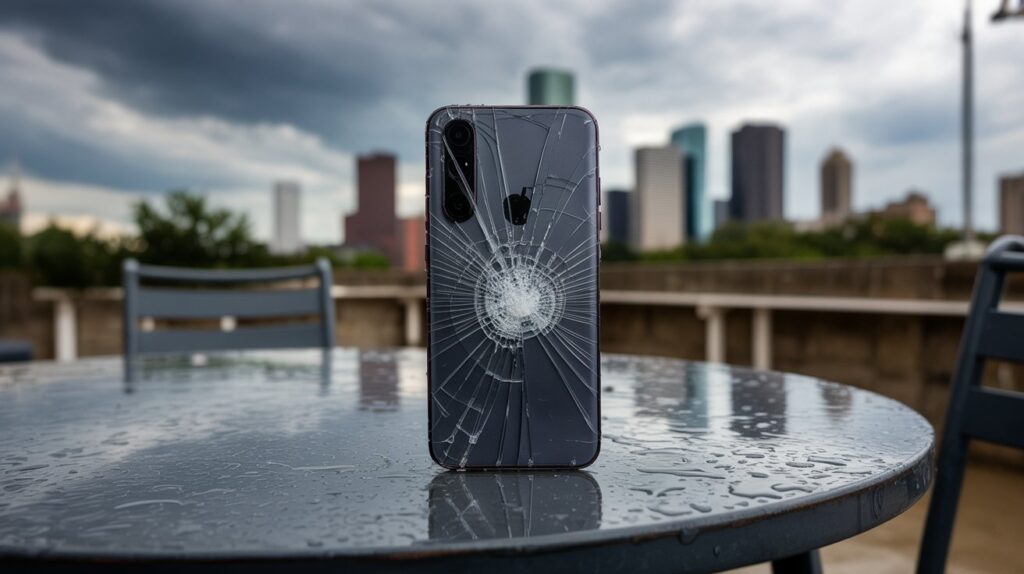
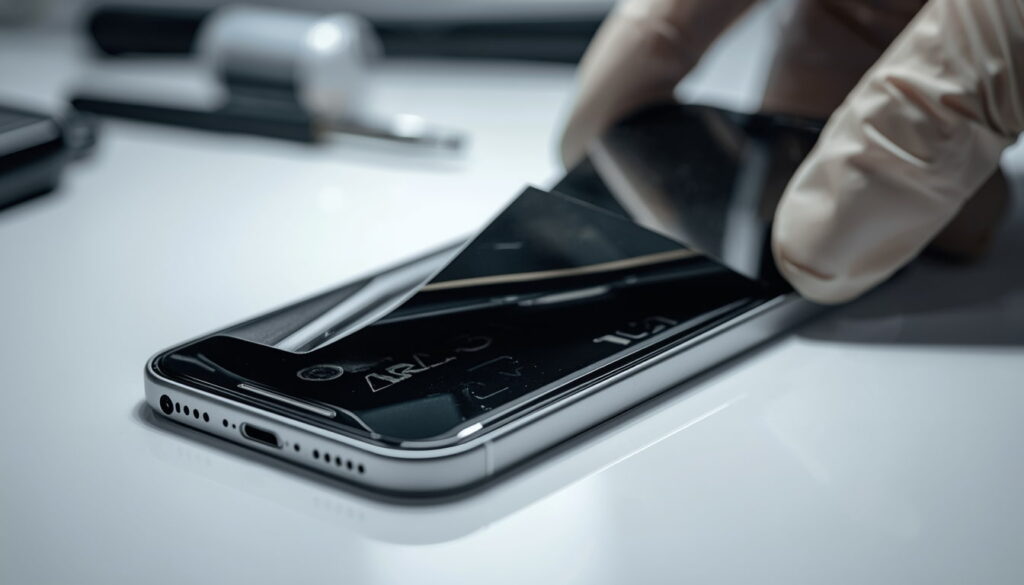
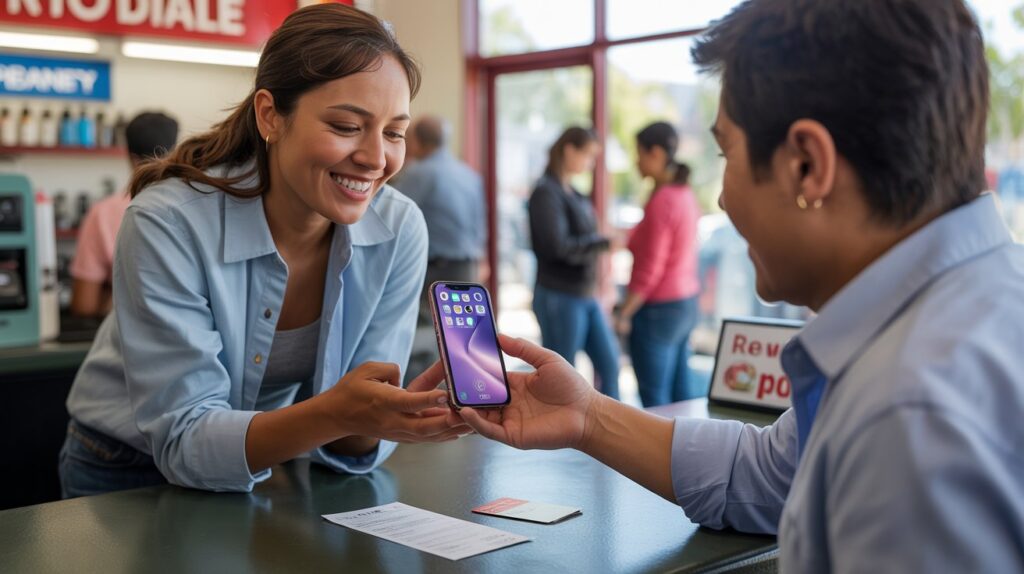
A cracked phone screen is one of the most common tech mishaps, with studies showing that over 50 million screens are broken each year in the US alone. If you’re a Houston resident staring at the dreaded spiderweb crack, your first thought is likely: “How much will this cost to fix?”
Navigating the repair market can be overwhelming, with prices varying from The Woodlands to Sugar Land. This guide breaks down the costs, timelines, and options for fixing your phone in Houston, so you can make an informed decision for your device and your wallet.
What Is the Average Cost to Repair a Cracked Phone Screen in Houston?
The cost of screen repair isn’t a flat rate. It fluctuates based on several factors, primarily the make and model of your device and the quality of the replacement parts used. Generally speaking, you can expect to pay anywhere from $70 to over $400.
Here is a breakdown of what typically influences the final bill:
The Model Age: Older phones are generally cheaper to fix. Parts are more abundant, and the technology (often LCD screens) is less expensive to manufacture.
Screen Technology: Newer flagship phones use OLED or AMOLED displays. These offer vibrant colors and deep blacks but are significantly more expensive to replace than standard LCDs.
Damage Extent: Is it just the glass that is cracked, or is the underlying LCD/OLED panel damaged? If your screen has black blobs, colored lines, or doesn’t respond to touch, you need a full assembly replacement, which costs more.
Estimated Price Ranges
While prices change frequently, here are current market averages you might find in Houston repair shops:
iPhone Repair:
Older models (iPhone 8, X, 11): $70 – $110
Mid-range models (iPhone 12, 13): $120 – $200
Pro/Max models (iPhone 14/15 Pro Max): $250 – $400+
Are There Affordable Options for Samsung Galaxy Screen Repairs?
Samsung owners often face sticker shock when getting repair quotes. This is because Samsung’s Infinity Displays and curved edge screens are sophisticated pieces of technology that are difficult to manufacture and install.
However, you do not always have to pay top dollar. Here are a few ways to find more affordable options in Houston:
Independent Repair Shops: Third-party shops often charge 20-30% less than official service centers. Many reputable shops in areas like Westheimer or Harwin Drive offer competitive pricing.
Refurbished Screens: Some shops offer “refurbished” screens. These are original Samsung OLED panels where the broken glass was professionally replaced with new glass. You get the original display quality at a lower price point than a brand-new factory assembly.
Glass-Only Repair: If your display still works perfectly (no bleeding ink or touch issues), some specialized technicians can perform a glass-only repair. This is labor-intensive and risky, but it can save you significant money if you find a shop with the right equipment.
Always ask the technician if the replacement part is an “Service Pack” (original Samsung part) or aftermarket. Aftermarket screens are cheaper but may have slightly lower brightness or color accuracy.
How Long Does It Take to Fix a Cracked Phone Screen in Houston?
Time is money, and nobody wants to be disconnected from their digital life for long. Fortunately, screen repair is usually a quick process.
Walk-In Services
Most independent repair shops and mall kiosks in Houston operate on a first-come, first-served basis.
Average time: 30 to 60 minutes.
Process: You drop the phone off, grab a coffee or run an errand, and pick it up within the hour.
Mobile Repair Services
If you cannot leave work or your home, mobile repair vans are becoming popular in the greater Houston metro area.
Average time: 45 minutes.
Process: A technician drives to your location and fixes the phone inside their specialized van. You pay a small premium for the convenience, but you save travel time.
Official Manufacturer Repair (Mail-In)
If you choose to send your phone directly to Apple or Samsung, or if you visit a highly busy authorized service provider without an appointment:
Average time: 5 to 7 business days (for mail-in) or same-day with a long wait (for in-store).
Is It Cheaper to Repair or Replace a Phone Screen?
This is the most common dilemma. Should you sink $200 into a two-year-old phone, or just put that money toward a new one?
To make the right choice, consider the 50% Rule: If the cost of the repair is more than 50% of the current market value of the phone, it is usually better to replace it.
Consider these scenarios:
When to Repair:
Data Preservation: Your photos and files are not backed up. Fixing the screen is often the only way to access your data if the touch functionality is broken.
High-Value Device: You have a recent model (1-2 years old). A $200 repair is much cheaper than a $1,000 new phone.
Minor Damage: The phone works perfectly otherwise, and the battery life is still good.
When to Replace:
Obsolete Tech: Your phone no longer receives software updates.
Multiple Issues: The screen is cracked, and the charging port is loose, and the battery dies in three hours. The combined repair costs will exceed the phone’s value.
Carrier Deals: Your carrier is offering a high trade-in value (sometimes they accept cracked phones) for an upgrade.
Can I Get Same-Day Screen Repair Services in Houston?
Absolutely. Houston is a major hub for tech services, and competition is fierce. This works in your favor as a consumer.
Most repair businesses structure their inventory to support same-day repairs for the most popular models (recent iPhones and Samsung Galaxy S series). If you have a Google Pixel, OnePlus, or a less common model, the shop might need to order the part, which can take 1-3 days.
Tips for ensuring same-day service:
Call Ahead: Before driving to a shop, call them to confirm they have the specific screen color and model in stock.
Book an Appointment: Many shops offer online booking systems. This guarantees your spot in the queue.
Check Hours: Repairs typically stop an hour before closing. Don’t show up at 5:45 PM for a 6:00 PM close time.
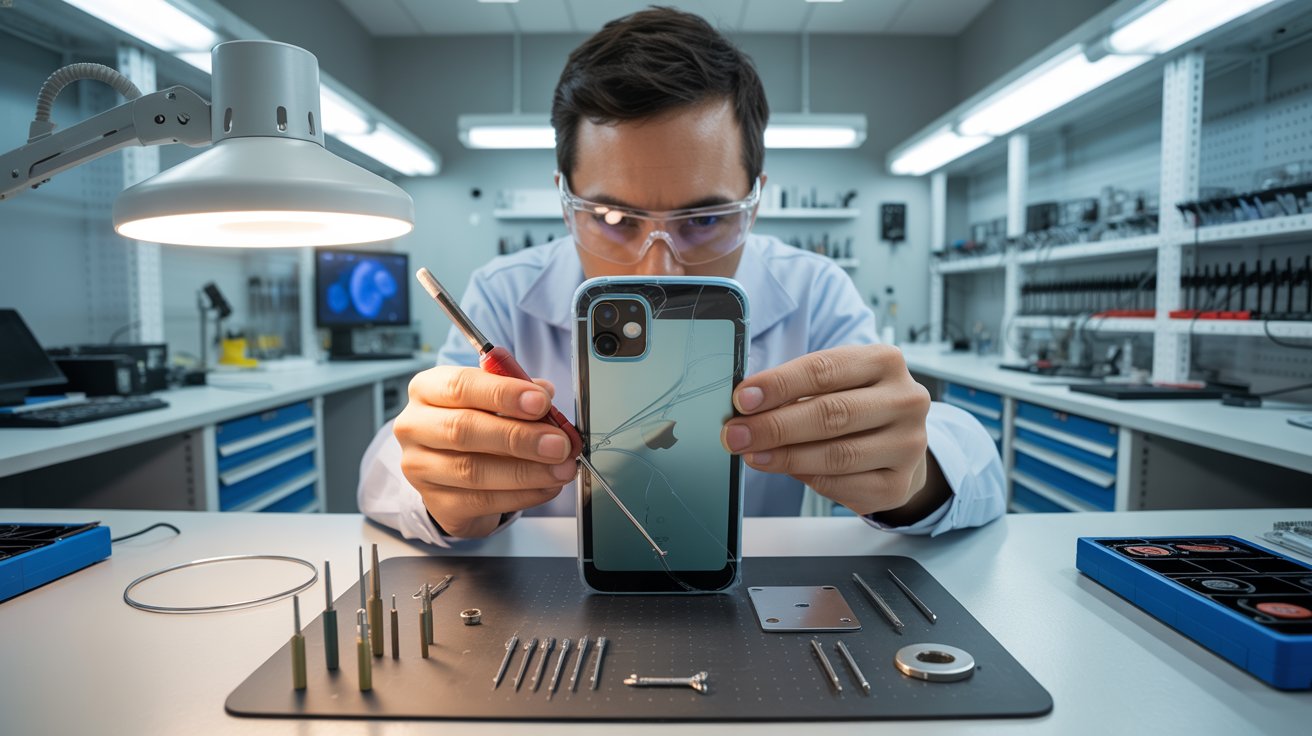
What Are the Risks of DIY Phone Screen Repair?
A quick search online will reveal dozens of “DIY Repair Kits” costing half the price of a professional service. While tempting, these kits come with significant risks that can turn a $100 repair into a $1,000 mistake.
1. Losing Specific Features
Modern phones are packed with sensors attached to the screen assembly.
Face ID / Touch ID: If you damage the delicate ribbon cables connecting these sensors during the transfer, you will permanently lose biometric security features.
True Tone: On iPhones, simply swapping the screen without a special programmer tool will disable the True Tone display feature.
2. Tiny, Fragile Parts
Inside your phone are screws the size of a grain of sand. If you put the wrong screw in the wrong hole (often differing by mere millimeters in length), you can drill into the motherboard, effectively killing the phone instantly.
3. Battery Safety
To remove a broken screen, you often have to apply heat and pry near the battery. Puncturing a lithium-ion battery can cause it to swell, spark, or even catch fire. Professional technicians use safety guards and specialized heating pads to prevent this.
4. Inferior Parts
DIY kits sold on general marketplaces often use the lowest quality glass and LCDs. You might finish the repair only to find the screen is dim, has a blue tint, or cracks again with the slightest bump.
Making the Right Call for Your Device
A cracked screen can be a hassle, but in Houston, getting it fixed is easier than ever. Whether you opt for a fast 30-minute repair at a shop or a convenient mobile service that comes to you, there’s no need to put up with shattered glass. By comparing the costs and benefits of repair versus replacement, you can keep your device running smoothly and save money in the long run. Let Repair My Devices help you get back to your digital lifecontact us today for fast, reliable screen repair!
That unmistakable roar from your PS5 isn’t just annoying it’s your console crying for help. Thousands of PS5 owners report their consoles sounding like jet engines, often drowning out game audio entirely.
This noise signals potential thermal damage if ignored. Let’s explore what causes it and how to fix it properly.
The “Jet Engine” Warning: Identifying the Sound of a Struggling Cooling Fan
A healthy PS5 operates at 20-35 decibels barely audible. The jet engine sound hits 50-70 decibels, comparable to a vacuum cleaner.
What different patterns mean:
Gradual escalation (quiet to loud over 20 minutes): Dust accumulation
Immediate loud operation: Severe dust buildup or dried thermal paste
Intermittent screaming: Coil whine combined with thermal throttling
Grinding or rattling: Mechanical failure requiring immediate attention
Your PS5’s fan speed responds directly to internal temperatures. When the APU exceeds 85°C, the fan maxes out to prevent damage that’s your jet engine sound.
When problems typically start:
Clean environments: 12-18 months
Pet owners: 8-12 months
Smokers: 4-8 months
The Lethal Combination Clogging Your Heatsink Right Now
It’s not just dust inside your PS5 it’s a toxic mixture creating an insulating blanket over your cooling system.
The HDMI Port Weakness: Why Wiggling Your Cable Causes Permanent Damage
The PS5’s HDMI 2.1 port is surface-mounted with only solder pads for support no reinforcement bracket.
How normal use causes damage:
Heavy/stiff cables exert constant leverage
Moving the console for cleaning
Cable swapping between devices
The deadly “wiggle test” when connections seem unstable
Each wiggle breaks microscopic amounts of solder. Damage accumulates invisibly until total failure.
The thermal connection: Marginal HDMI damage forces harder video processing, generating more heat and louder fans. Users then chase thermal solutions for what’s actually a connector problem.
Prevention strategies:
Use thin, flexible HDMI 2.1 cables
Create slack loops to reduce port stress
Never wiggle cables to “fix” connections
Treat insertions as permanent installations
Repair costs:HDMI port replacement runs $100-150 professionally. Prevention costs under $30 in quality cables.
DIY Canned Air vs. Professional Deep Clean: Why Blowing Air In Can Make It Worse
Canned air seems like the obvious solution. For your PS5, it’s potentially disastrous.
Why canned air fails:
Redistribution, not removal: High-pressure air pushes dust deeper into heatsink fins rather than extracting it
Fan spin damage: Forced spinning exceeds design limits, stressing bearings and potentially generating damaging electrical feedback
Static generation: Rapidly flowing air creates electrostatic discharge risk
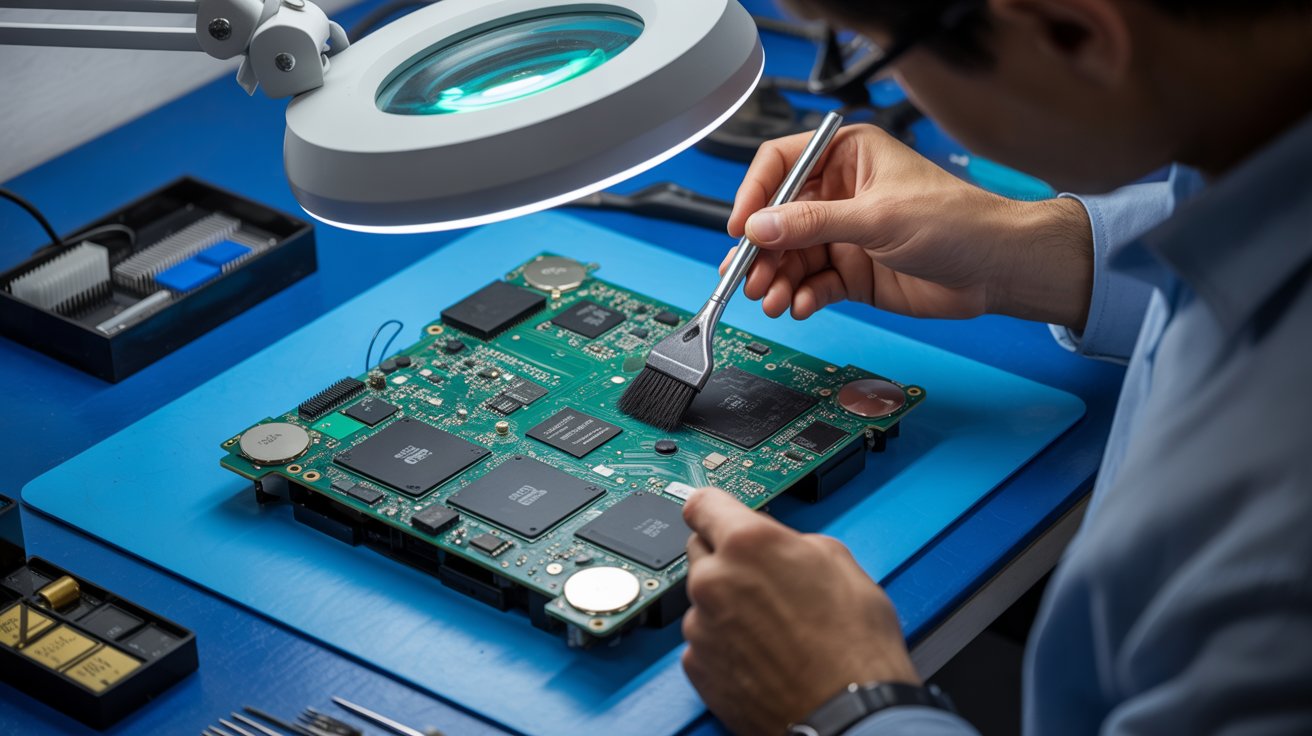
What professional cleaning includes:
Complete disassembly (fan, heatsink, power supply)
Component-specific cleaning with proper tools
Thermal interface replacement
Reassembly with proper torque and testing
Temperature verification under load
Cost comparison:
Approach
Cost
Effectiveness
Long-term
DIY canned air
$10
10-20%
Returns in weeks
Professional clean
$100-150
95%+
Lasts 12-18 months
Finding reputable service: Look for specific PS5 experience, micro-soldering capability, work warranties, and before/after documentation. Avoid shops with no reviews or suspiciously low prices.
How Heat Kills Your Frame Rates (FPS) in Competitive Gaming
That loud fan isn’t just annoying, it’s warning you about performance loss happening right now.
Thermal throttling explained:
When your APU approaches dangerous temperatures, the system automatically:
Reduces clock speeds
Limits power draw
Scales down resolution/effects
Caps frame rates
This happens invisibly no warning, just degraded performance.
Real performance impact:
Game
Clean Console
Dusty Console
Fortnite (120Hz mode)
Stable 120 FPS
90-110 FPS with dips
Warzone 2.0
100-120 FPS
70-95 FPS with stuttering
Demanding AAA titles
Stable 60 FPS
45-55 FPS with drops
For competitive gamers, this means:
Delayed input response
Inconsistent frame pacing
Visual stuttering during crucial moments
Environmental optimization:
Maintain room temperature at 68-72°F
Ensure 4″+ clearance on all ventilated sides
Never place on carpet or soft surfaces
Consider vertical positioning (often runs cooler)
Conclusion: Your Action Plan
Today:
Rate your fan noise severity
Check console placement and clearances
Clean exterior and vacuum dust ports
This month:
Schedule professional cleaning if noise is persistent
Houston computer repair experts reveal why your “dying” laptop might just need a $150 upgrade to feel brand new again.
Every week, frustrated Houston residents walk into computer repair shops ready to spend $800+ on a new laptop. Here’s what most discover: 80% of “slow” laptops aren’t broken at all. They’re just being held back by outdated components that cost a fraction of a new computer to fix.
Before you go laptop shopping, let’s break down exactly why your computer has slowed to a crawl and the three fixes that can restore lightning-fast performance.
Why Old Hard Drives (HDD) Are the Bottleneck
If your laptop is more than 3-4 years old and you’ve never upgraded the storage, there’s a 90% chance it’s running on a traditional Hard Disk Drive (HDD). That spinning disk is almost certainly why you’re waiting 3-5 minutes for your laptop to boot up every morning.
How HDDs Work (And Why They’re So Slow)
Picture an old record player. Inside your hard drive, there’s an actual metal disk spinning at 5,400-7,200 rotations per minute. A tiny mechanical arm moves back and forth, reading data as it goes.
Now imagine asking that record player to simultaneously load Windows, open Chrome with 15 tabs, run antivirus software, sync Dropbox, and update applications. That mechanical arm is physically moving thousands of times per second, trying to find scattered data. It’s like a librarian running through a massive library, pulling one book at a time, while everyone shouts requests simultaneously.
HDDs Get Slower Over Time
Here’s what most people don’t realize: HDDs don’t just stay slow they get worse.
As you use your computer:
File fragmentation increases — Data scatters across the disk like puzzle pieces
The disk fills up — Below 15% free space, performance drops exponentially
Mechanical wear occurs — Moving parts degrade after 20,000+ hours of operation
Bad sectors develop — Corrupted areas force the system to work around them
Warning signs your HDD is dying:
Clicking or grinding noises
Files that won’t open or take forever to load
Frequent freezing when accessing files
Windows taking 5+ minutes to boot
Blue Screen of Death errors
SSD vs. HDD: The 10x Speed Difference Explained Simply
The solution that transforms sluggish laptops into speed demons? A Solid State Drive (SSD).
What Makes SSDs So Much Faster?
An SSD has no moving parts whatsoever. Instead of spinning disks, it uses flash memory chips the same technology in your smartphone, just faster and more sophisticated.
Think of it like this:
HDD: A librarian running through a physical library, grabbing books one at a time
SSD: Instant digital access to any book with a simple search
There’s no waiting for anything to physically move. When your computer requests data, the SSD delivers it in nanoseconds rather than milliseconds.
Real-World Speed Comparison
Task
HDD Time
SSD Time
Windows Boot
2-5 minutes
15-30 seconds
Opening Word
30+ seconds
2-3 seconds
Opening Photoshop
1-2 minutes
10-15 seconds
Browser Launch
15-30 seconds
2-5 seconds
Sleep to Wake
30+ seconds
2-3 seconds
For most Houston laptop users, a standard SATA SSD ($40-80 for 500GB) delivers all the speed improvement you’ll notice for everyday tasks. You’d only need faster NVMe drives for professional video editing or massive file transfers.
The Multitasking Muscle: How Much Memory Do You Actually Need?
RAM (Random Access Memory) is your laptop’s “working memory” where active programs live for quick access. If your SSD is the filing cabinet, RAM is your desk where you spread out files you’re actively using.
Why RAM Matters (Especially for Chrome Users)
When you run out of RAM, your computer borrows storage space as “virtual memory.” The problem? Even a fast SSD is 100,000x slower than RAM.
When your system starts swapping data between RAM and storage, you’ll notice:
Lag when switching between programs
Stuttering when scrolling
Programs freezing for seconds at a time
That spinning wheel of doom
Chrome Is a RAM Monster
Here’s what we typically see:
Chrome Usage
RAM Needed
5 tabs (simple sites)
500MB – 1GB
10 tabs (mixed sites)
1.5GB – 2.5GB
15 tabs + YouTube
3GB – 4GB
20+ tabs + extensions
4GB – 6GB
RAM Recommendations
4GB: Barely enough for Windows 11 + light browsing. Not recommended in 2024.
8GB: Sweet spot for most users. Handles 10-15 Chrome tabs comfortably.
16GB: Ideal for professionals, multitaskers, and those who keep many programs open.
Quick check: Press Ctrl + Shift + Esc to open Task Manager. If you’re regularly at 85-100%
memory usage, a RAM upgrade will make a significant difference.
How We Upgrade Your Speed Without Losing Your Files
The biggest fear we hear: “Will I lose all my photos and files?”
Absolutely not when done correctly.
The Professional Upgrade Process
Step 1: Full System Backup Before touching anything, we create a complete backup of your existing drive files, programs, settings, everything.
Step 2: Drive Cloning Using professional software, we create an exact sector-by-sector copy onto the new SSD. When you turn on your laptop after the upgrade, everything looks exactly the same same desktop, same files, same programs. Just incredibly faster.
Step 3: Installation & Optimization The new SSD is installed, TRIM is enabled, and we verify all data transferred correctly.
Your old drive can be returned to you in an external enclosure for extra backup storage, or securely wiped and recycled.
Cooling Down an Overheating CPU to Regain Speed
Here’s a factor most “speed up your laptop” articles overlook: thermal throttling.
What Is Thermal Throttling?
Your CPU generates significant heat. To prevent damage, processors automatically slow down when temperatures exceed safe limits (90-100°C). This can reduce performance by 30-50% or more.
Why Laptops Overheat Over Time
Dust accumulation is the biggest culprit. Over 2-3 years, debris forms an insulating layer on your heatsink and clogs your fan. Other causes include dried-out thermal paste, blocked vents, and failing fans.
Signs of thermal throttling:
Fan running constantly at maximum
Hot keyboard and bottom
Fast at first, then slows significantly under load
Random shutdowns
The Fix
Professional thermal maintenance includes complete disassembly, compressed air cleaning, old thermal paste removal, fresh thermal paste application, and fan inspection. We regularly see laptops drop from 95°C to 65-75°C after proper maintenance, the difference between a throttled machine and one running at full capability.
$150 Upgrade vs. $800 New Laptop: The Smart Choice
Let’s do the math retailers hope you never calculate.
Typical Upgrade Costs
Upgrade
Total Cost
500GB SSD + Installation
$100-150
RAM Upgrade (8GB → 16GB)
$60-100
Thermal Cleaning
$40-80
Complete Refresh
$150-250
Side-by-Side Comparison
Factor
$150 Upgrade
$800 New Laptop
Boot time after
15-30 seconds
15-30 seconds
Your files/programs
All preserved
Require manual transfer
Learning curve
None
Hours of setup
Environmental impact
Minimal
Significant
A 5-year-old laptop with an i5 or i7 processor is still plenty powerful for everyday tasks. The CPU handles email, browsing, and productivity just fine it’s the HDD and limited RAM holding it back.
When to Upgrade vs. Replace
Upgrade if: Your laptop is 3-6 years old with working screen/keyboard, has an i3/i5/i7 processor, and has upgradeable components.
Replace if: Your laptop is 7+ years old, has a low-power Celeron processor, has multiple broken components, or has soldered (non-upgradeable) storage and RAM.
Take Action Today
A slow laptop doesn’t mean you need a new laptop. In most cases, the culprit is an outdated hard drive, insufficient RAM, or thermal issues causing CPU throttling.
For $150-250 a fraction of a new computer’s cost you can transform your sluggish machine into a responsive tool that serves you for years to come.
Before resigning yourself to laptop shopping, get a professional assessment. Your wallet and the environment will thank you.
That moment when your iPhone starts acting up. The battery drains before lunch. The screen has that annoying crack spreading like a spider web. Apps take forever to load. Your first instinct screams “time for an upgrade.” But hold on a second.
Here in Lawndale, something interesting is happening. More residents are walking past the Apple Store and heading straight to repair shops instead. After years of covering tech trends and consumer behavior, I’ve witnessed a genuine shift in how people think about their devices. The upgrade cycle that once seemed mandatory now feels optional.
Let me show you why fixing your current iPhone might be the smartest decision you make in 2026.
Breaking Down the True Cost of Modern Flagship Upgrades
Let’s talk real numbers. The iPhone 16 Pro Max launched at $1,199. The base iPhone 16 starts at $799. These aren’t just prices – they’re mortgage payments for some families.
But the sticker price only tells part of the story.
The Complete Cost Picture
Expense Category
New iPhone 16 Pro
Keeping Current Phone
Device Cost
$1,199
$0
New Case & Screen Protector
$80-150
Already owned
Data Transfer Service (optional)
$30-50
Not needed
AppleCare+ (2 years)
$199
Current coverage continues
Selling Old Device (credit)
-$200 to -$400
N/A
Net Cost
$1,000-1,200
$0
Now compare that to common repairs:
Repair Type
Average Cost in Lawndale
Battery Replacement
$79-99
Screen Repair
$129-229
Charging Port Fix
$69-89
Speaker/Microphone
$59-79
Back Glass Replacement
$99-149
Camera Repair
$89-149
The math speaks for itself. Even combining multiple repairs rarely approaches half the cost of a new device. Lawndale families are doing these calculations and making practical choices.
The Financing Trap
Carriers love promoting those “just $33 per month” deals. Sounds manageable, right? But that’s $792 over 24 months – often more than the phone’s actual value after trade-in credits expire. Miss a payment or want to switch carriers? You’re locked in or paying penalties.
I’ve talked to dozens of Lawndale residents who felt trapped in these financing arrangements. One family on Hawthorne Boulevard told me they were paying for three phones simultaneously because upgrade offers kept seeming too good to pass up.
Repair breaks this cycle. One payment, phone fixed, done.
The “Planned Obsolescence” Myth: Is Your Phone Actually Slow, or Just Full of Storage?
Here’s something repair technicians in Lawndale see constantly – phones that owners assumed were dying but actually just needed basic maintenance.
Common Culprits Behind “Slow” iPhones
Storage Overload When your iPhone storage exceeds 90% capacity, performance tanks dramatically. The operating system needs breathing room to function properly. Those 47,000 photos from 2019? They’re not just memories – they’re performance killers.
Background App Refresh Dozens of apps refreshing data constantly drain processing power. Most people never adjust these settings.
Outdated iOS Installation Ironically, both updating too quickly and not updating cause problems. Fresh iOS releases often run sluggish initially until Apple optimizes them. Meanwhile, severely outdated systems miss crucial performance patches.
Battery Health Degradation When battery health drops below 80%, iOS automatically throttles processor speed to prevent unexpected shutdowns. Your phone isn’t slow – it’s being deliberately slowed to protect itself.
Accumulated Cache and Junk Data Years of app installations, deletions, and usage leave digital debris that accumulates over time.
Quick Fixes Before Considering Repair or Replacement
Issue
DIY Solution
Time Required
Low Storage
Delete old photos, offload apps
30-60 minutes
Background Drain
Disable background refresh for non-essential apps
10 minutes
General Sluggishness
Full restart (not just sleep)
2 minutes
Poor Battery Life
Check battery health in Settings
1 minute
App Crashes
Delete and reinstall problematic apps
5 minutes each
A local repair shop owner on Inglewood Avenue mentioned that roughly 30% of customers coming in for “repairs” actually just needed guidance on maintenance. Good shops will tell you this honestly instead of charging for unnecessary work.
Calculating the Value of a $100 Repair on a $800 Device
This is where the decision becomes crystal clear.
Think about your car. If your three-year-old Honda needed a $400 brake job, would you immediately buy a new car? Of course not. The repair cost represents a small fraction of the vehicle’s value and extends its usable life significantly.
Your iPhone deserves the same logic.
The Repair Value Formula
Device Original Cost: $800 (iPhone 14 example) Current Age: 2 years
Remaining Useful Life Without Repair: 6-12 months Repair Cost: $99 (battery replacement)
Extended Useful Life After Repair: 2-3 additional years
Cost Per Month Comparison:
Scenario
Total Cost
Usable Months
Cost Per Month
New iPhone 16
$999
48 months
$20.81
Repair Current Phone
$99
36 months additional
$2.75
That’s nearly 8x more economical to repair.
Real Lawndale Example
Maria, a teacher living near Lawndale Elementary, shared her experience with me. Her iPhone 13 developed a cracked screen and weak battery after 2.5 years of use. She initially budgeted for a new iPhone 15.
Instead, she spent $189 on screen replacement and battery swap at a local repair shop. Her phone now performs like new. She used the $800 savings toward her daughter’s college fund.
“It felt like getting a new phone without the new phone price,” she told me.
That sentiment echoes across Lawndale households making similar choices.
Why a Simple Battery Swap Mimics the “New Phone Feel”
Battery degradation creates a cascade of problems that make phones feel ancient. Understanding this reveals why battery replacement delivers such dramatic results.
What Happens When Batteries Age
Chemical Degradation Lithium-ion batteries physically deteriorate with each charge cycle. After 500 cycles (roughly 18-24 months for average users), capacity diminishes noticeably.
Performance Throttling Apple’s performance management feature kicks in when batteries can’t deliver peak power consistently. This isn’t malicious – it prevents sudden shutdowns. But it makes everything slower.
Heat Generation Degraded batteries generate more heat during use and charging. This heat further damages internal components and makes phones uncomfortable to hold.
Unreliable Percentage Readings Old batteries provide inconsistent power, causing iOS to misread remaining charge. Your phone might die at 23% or survive hours at 1%.
The Transformation After Battery Replacement
Aspect
Before Replacement
After Replacement
Screen-on Time
4-5 hours
8-10 hours
App Launch Speed
Noticeably delayed
Instant response
Camera Performance
Laggy, sometimes crashes
Smooth operation
Charging Time
2.5-3 hours
1.5-2 hours
Unexpected Shutdowns
Frequent
Eliminated
Heat During Use
Warm/hot
Normal temperature
Customers frequently describe the post-battery-swap experience as “like someone gave me a new phone.” The performance difference is that stark.
A $79-99 investment creates a device that functions identically to one costing ten times more. Lawndale residents are catching on to this reality.
The Hidden Convenience of Keeping Your Current Device
Beyond money, there’s something nobody talks about enough – the sheer hassle of switching phones.
The New Phone Transition Nightmare
Data Transfer Headaches
Despite Apple’s promises of seamless transfers, things go wrong. Apps need re-authentication. Some data doesn’t transfer properly. Fitness history, certain app configurations, and saved passwords sometimes vanish into the digital void.
Learning Curve New iOS features and interface changes require adjustment. Button placements shift. Settings menus reorganize. Features you relied on get buried or removed.
Accessory Incompatibility That expensive car mount? Might not fit the new size. Your favorite case? Obsolete. Desk charging stand? Wrong dimensions.
Account Security Disruptions Banking apps, two-factor authentication, and security keys all need reconfiguration. Some require waiting periods or verification calls.
The Inevitable Missing Feature Apple removes something you actually used with almost every generation. Headphone jack, physical SIM tray, distinct sizing – change is constant.
What You Keep by Repairing
Preserved Element
Value
All app configurations
Hours of setup time
Message history
Priceless memories
Photo organization
Years of albums
Health data continuity
Long-term tracking
Muscle memory
Zero relearning
Existing accessories
$100-300 worth
Trusted device recognition
Security convenience
One Lawndale business owner on Rosecrans Avenue told me he dreads phone transitions more than tax season. His repair approach? “Fix what breaks, replace nothing that works.” His iPhone 12 remains his daily driver in 2026.
Why Lawndale Residents Are Going Green by Repairing
Environmental consciousness is growing across Los Angeles County, and Lawndale is no exception. Phone repair represents one of the easiest ways to reduce personal environmental impact.
The Environmental Cost of New Phones
Manufacturing a single smartphone requires:
Resource
Amount
Water
3,190 gallons
Cobalt
8 grams
Lithium
0.5 grams
Copper
15 grams
Gold
0.034 grams
Silver
0.34 grams
Rare Earth Elements
0.5 grams
CO2 Emissions
70-100 kg
These materials are mined from the earth, processed through energy-intensive manufacturing, shipped across oceans, and distributed through complex logistics networks.
The E-Waste Crisis
Americans discard approximately 151 million phones annually. Despite recycling programs, only 15-20% of e-waste gets properly processed. The rest ends up in landfills where toxic components leach into soil and groundwater.
Lawndale sits just miles from the Pacific Ocean. Residents increasingly understand that local choices have regional environmental consequences.
How Repair Helps
Each repaired phone:
Delays one new phone’s manufacturing footprint
Prevents one device from entering the waste stream
Reduces demand for conflict minerals
Lowers carbon emissions from shipping and production
Local Impact Calculation:
If just 10,000 Lawndale residents chose repair over replacement this year:
700,000-1,000,000 kg of CO2 emissions prevented
31.9 million gallons of water conserved
10,000 devices kept out of landfills
The Lawndale Environmental Coalition has actually started promoting device repair as part of their sustainability initiatives. Several local repair shops now partner with community recycling programs for components that can’t be salvaged.
Repair Shops Going Green
Responsible repair businesses in Lawndale are adopting eco-friendly practices:
Recycling damaged components properly
Using refurbished parts where quality permits
Offering trade-in programs for unrepairable devices
Minimizing packaging waste
Providing e-waste disposal guidance
When you repair locally, you’re supporting businesses that keep dollars and environmental responsibility within the community.
When SHOULD You Upgrade? An Honest Checklist for When a Phone Is Truly Dead
Look, I’m not saying repairs solve everything. Sometimes phones genuinely need replacing. Here’s an honest assessment framework.
Signs Repair Makes Sense
Battery drains quickly but phone otherwise works Simple battery replacement solves this completely.
Cracked screen with functional touch capability Screen replacements are straightforward and cost-effective.
Charging port issues Usually fixable with component replacement.
Speaker or microphone problems Typically component-level repairs.
Camera quality degradation Often lens cleaning or module replacement.
Single button failure Discrete repairs available for most buttons.
Software running slowly Usually maintenance or battery-related, not hardware death.
Signs Replacement Makes More Sense
Water damage with multiple failing systems Water damage spreads. Today’s speaker problem becomes tomorrow’s motherboard failure.
Bent or warped frame Structural damage compromises everything. Repairs become temporary fixes.
Repeated repairs on same device If you’ve repaired the same phone three or four times within a year, the writing’s on the wall.
Phone is 5+ years old and struggles with essential apps Eventually, software requirements exceed hardware capabilities. Banking apps, rideshare apps, and security updates may stop supporting older devices.
Motherboard failure Logic board repairs cost nearly as much as replacement and have lower success rates.
Device no longer receives security updates Using an unsupported phone for banking, payments, or sensitive information creates real security risks.
Repair cost exceeds 50% of replacement value At some point, economics favor replacement.
The Honest Decision Matrix
Situation
Repair Cost
Phone Age
Security Updates
Recommendation
Battery dying, 2-year-old phone
$99
Recent
Supported
Repair
Cracked screen, 3-year-old phone
$179
Moderate
Supported
Repair
Multiple issues, 4-year-old phone
$300+
Older
Limited
Consider replacing
Water damage, any age
$200-400
Any
Any
Probably replace
Motherboard issues
$350+
Any
Any
Replace
Minor issue, 5+-year-old phone
$100
Old
Unsupported
Replace
Questions to Ask Yourself
Does my current phone do everything I actually need?
Am I upgrading for genuine utility or just desire for newness?
Can I redirect upgrade money toward something more valuable?
How much time will switching devices actually cost me?
Is there a repair option I haven’t explored?
A quality repair shop will honestly tell you when repair doesn’t make sense. Shops that push repairs on genuinely dead devices aren’t serving customers well. Ask for honest assessments and get second opinions when recommendations seem questionable.
Finding Quality Repair Services in Lawndale
Not all repair shops deliver equal quality. Here’s what Lawndale residents should look for:
Green Flags
Transparent pricing displayed clearly
Warranty on repairs (minimum 90 days)
Willingness to diagnose before committing to repair
Genuine or high-quality aftermarket parts options
Positive local reviews from verified customers
Clear communication about repair timelines
Honest assessment when repair isn’t recommended
Red Flags
Vague pricing until device is in their hands
No warranty or extremely short coverage
Pressure to repair immediately without diagnosis
Unwillingness to discuss parts sourcing
No physical storefront or accountability
Extremely low prices (quality parts cost money)
Poor communication or missed timelines
What to Expect During Quality Repairs
Repair Type
Typical Timeframe
Parts Quality Options
Battery
30-60 minutes
OEM or premium aftermarket
Screen
45-90 minutes
OEM, premium aftermarket, or refurbished
Charging Port
30-60 minutes
OEM or aftermarket
Camera
45-75 minutes
OEM recommended
Speakers
30-45 minutes
OEM or aftermarket
Professional shops will explain the differences between parts options and let you make informed decisions based on budget and quality preferences.
The Bottom Line for Lawndale Residents
The upgrade cycle that phone manufacturers promote isn’t designed for your benefit. It’s designed for their quarterly earnings reports. Each year, “improvements” become more incremental while prices climb higher.
Lawndale is a practical community. Families here work hard for their money. Spending $1,000+ on marginal camera improvements and slightly faster processors doesn’t align with practical values.
Repair represents control. Control over your finances. Control over your time. Control over your environmental footprint. Control over the upgrade timeline.
That iPhone in your pocket probably has years of life remaining. A skilled technician can restore it to peak performance for a fraction of replacement cost. You’ll keep your data, your settings, your muscle memory, and your money.
The choice seems pretty clear.
Frequently Asked Questions
How much does iPhone screen repair cost in Lawndale?
Screen repairs typically range from $129-229 depending on your iPhone model. Newer models with OLED displays cost more than older LCD screens. Quality shops offer both OEM and aftermarket options at different price points.
Is it worth repairing an iPhone with a cracked screen?
Absolutely, in most cases. Screen repair costs represent 10-20% of new phone prices. Unless your device has multiple other issues or is extremely outdated, screen repair delivers excellent value and extends usable life by years.
How long does iPhone battery replacement take?
Most professional repair shops complete battery replacements within 30-60 minutes. Some offer same-day service or even while-you-wait repairs. Complex models may require slightly longer, but rarely more than 90 minutes.
Will repairing my iPhone void its warranty?
If performed by Apple or Apple Authorized Service Providers, no. Third-party repairs may affect Apple warranty coverage, but most phones needing repair are already outside warranty periods anyway. Many repair shops offer their own warranties on work performed.
How do I know if my iPhone needs a new battery?
Check Settings > Battery > Battery Health. If Maximum Capacity shows below 80%, Apple recommends replacement. Other signs include rapid drainage, unexpected shutdowns, phone getting hot during normal use, or sluggish performance that worsens over time.
Can water-damaged iPhones be repaired?
Sometimes, but success rates vary significantly. Minor water exposure caught quickly has better outcomes. Extensive water damage affecting multiple components often makes repair impractical. Honest technicians will assess damage before recommending repair or replacement.
You place your phone on the wireless charger like you do every night. Nothing happens. You adjust the position. Still nothing. That tiny crack on your phone’s back glass? It’s not just cosmetic damage anymore.
Here’s what most Houston phone users don’t realize: that “minor” back glass crack is silently draining your wallet, compromising your phone’s protection, and killing features you paid premium prices to enjoy.
Before you slap a case over it and call it a day, you need to understand exactly what’s happening beneath that shattered surface.
The Structural Integrity Risks of a Shattered Back
Modern smartphones aren’t built like the plastic phones of the 2000s. That sleek glass back panel serves multiple critical functions beyond looking good.
It’s Part of Your Phone’s Skeleton
Your phone’s back glass works with the metal frame to create a rigid structure. When that glass shatters, even partially, you lose significant structural support. The result? Your phone becomes more vulnerable to bending, flexing, and further damage from everyday use.
Think about it. Every time you sit down with your phone in your back pocket, slip it into a tight bag, or accidentally press against it, that compromised structure takes hits it can’t properly absorb anymore.
Thermal Management Gets Disrupted
The glass back helps dissipate heat from your processor during intensive tasks. Cracks interrupt this thermal distribution, causing your phone to run hotter. In Houston’s brutal summer heat, this becomes a serious problem. Overheating leads to battery degradation, performance throttling, and in extreme cases, permanent component damage.
The Domino Effect
One crack rarely stays one crack. Pressure points shift. Vibrations travel differently through compromised glass. What started as a single spider web pattern can expand across the entire panel within weeks, sometimes overnight after temperature fluctuations common during Houston’s unpredictable weather swings.
How Cracks Let Sweat and Rain Kill Your Motherboard
That glass back isn’t just structural. It’s your phone’s primary defense against Houston’s humid environment.
Moisture Finds Every Opening
Glass cracks create microscopic pathways directly into your phone’s internals. Houston’s average humidity hovers around 75%. Every time you step outside, your cracked phone absorbs atmospheric moisture like a sponge.
The damage happens gradually. Moisture reaches copper traces on circuit boards. Corrosion begins. Connection points deteriorate. One day your camera stops working. Then your speaker crackles. Eventually, your motherboard gives out entirely.
Sweat Is Worse Than Rain
Rain is water. Sweat is a corrosive cocktail of salts and minerals. Houston runners, outdoor workers, and anyone who exercises with their phone nearby should be especially concerned.
Sweat seeping through back glass cracks accelerates corrosion dramatically. We’ve seen phones come into our Houston repair shop with completely green motherboards. The owners had no idea the damage was happening because their screens still worked fine until they didn’t.
Water Resistance Rating? Gone.
That IP68 rating you paid extra for? It assumed your phone was intact. A cracked back glass immediately voids your water resistance protection. One unexpected rainstorm, one dropped phone near the pool, one spilled drink and your phone becomes an expensive paperweight.
Why Your MagSafe Might Stop Working
For iPhone users, back glass damage creates an additional problem most people never anticipate: MagSafe failure.
Understanding the Magnet Array
MagSafe isn’t just clever marketing. It’s a precise ring of magnets embedded beneath your back glass, aligned perfectly to connect with chargers and accessories. When back glass shatters, several things can go wrong.
Glass fragments can shift and interfere with magnetic alignment. The magnets themselves can become displaced or damaged. Even tiny movements in the internal positioning can break the connection your MagSafe charger needs.
The Charging Coil Problem
Directly beneath that glass sits your wireless charging coil. It’s a delicate copper component that relies on precise positioning to work efficiently. Cracked glass often means compromised charging coil protection.
We regularly see phones where wireless charging works intermittently after back glass damage. Sometimes it charges. Sometimes it doesn’t. Sometimes it heats up dangerously because the coil isn’t aligned properly with the charger.
Accessories Stop Connecting
MagSafe wallets that fall off constantly. Car mounts that won’t hold your phone securely. Battery packs that disconnect during use. These frustrations all trace back to that cracked back glass disrupting the magnetic connection points.
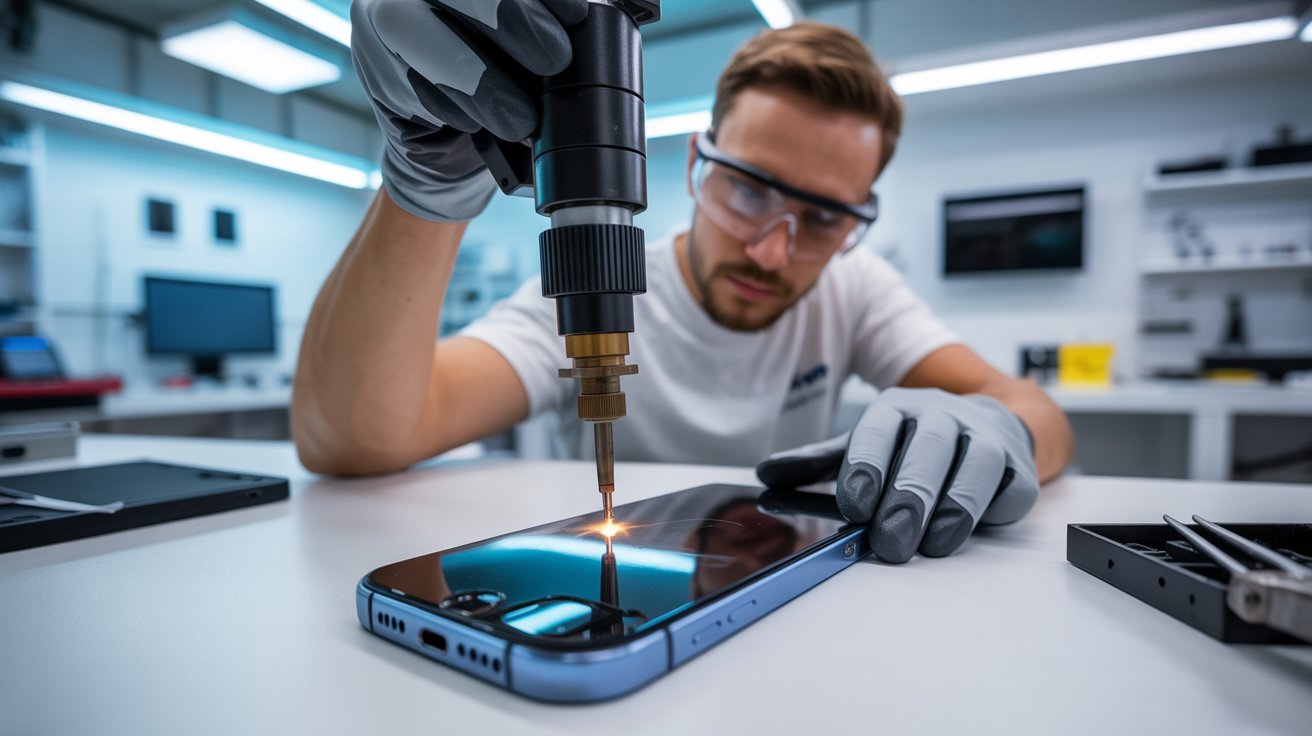
How We Use Precision Lasers to Remove Glass Without Prying
Traditional back glass repair is brutal. Technicians heat the phone excessively, then pry at the glass with tools that can easily slip and damage internal components. It’s risky, time-consuming, and often leaves phones worse than before.
Laser Technology Changes Everything
Our Houston repair facility uses precision laser machines specifically calibrated for back glass removal. Here’s how the process works:
The laser targets the adhesive layer between the glass and phone frame. It breaks down the bonding agent without generating excessive heat that could damage batteries, coils, or other components. The glass separates cleanly, without prying, scraping, or force.
Why This Matters for Your Phone
Heat damage is cumulative. Traditional repair methods expose your battery to temperatures that degrade its capacity permanently. Laser removal keeps heat localized to the adhesive layer only, preserving your battery health.
There’s also zero risk of pry tool slippage. No gouged frames. No scratched internal components. No technician error causing additional damage while trying to fix existing problems.
The Result
Your phone leaves our shop looking factory-new. The new back glass sits flush, sealed properly, and ready to protect your phone exactly as the manufacturer intended. Wireless charging works perfectly. MagSafe accessories connect reliably. Water resistance gets restored.
How Much Money You Lose Trading In a Cracked Phone
Planning to upgrade eventually? That cracked back glass is costing you more than you think.
Trade-In Value Destruction
Apple, Samsung, and carrier trade-in programs all categorize back glass damage as significant defects. Here’s what that means in real dollars:
An iPhone 14 Pro in good condition trades for approximately $400-500
The same phone with cracked back glass? Maybe $150-200
That’s $200-300 vanishing from your pocket
Third-Party Resale Gets Worse
Selling privately through Facebook Marketplace, Swappa, or Craigslist? Buyers in Houston are savvy. They know back glass damage means hidden moisture exposure risks. They’ll lowball aggressively or walk away entirely.
Even if you find a buyer, you’ll need to price significantly below market value to move a damaged device. The discount typically exceeds what professional repair would have cost.
The Math Makes Sense
Professional back glass repair typically runs $80-150 depending on your phone model. If that repair preserves $200-300 in trade-in value, you’re looking at a guaranteed return on investment.
Delaying repair only increases risk. Every day with a cracked back means more potential moisture damage, more structural degradation, and lower eventual resale value.
Case vs. Repair: Why Putting a Case Over the Cracks Isn’t a Permanent Fix
We understand the temptation. Cases are cheap. Repairs take time. Just covering the problem seems logical.
It’s not.
Cases Don’t Seal Anything
Phone cases protect against future impacts. They don’t seal existing damage. Moisture still reaches those cracks. Humidity still penetrates. Sweat still corrodes.
In fact, cases can make moisture problems worse. They trap humidity against your phone’s damaged surface, creating a constant exposure environment. The damage that might take months in open air happens in weeks under a case.
Glass Fragments Keep Moving
Those shattered pieces aren’t stable. Your phone vibrates constantly from notifications, calls, and haptic feedback. Each vibration shifts glass fragments slightly. Cases don’t prevent this movement—they just hide it.
Eventually, fragments work their way loose. They can damage internal components, interfere with wireless charging coils, or create new crack patterns that spread across previously undamaged areas.
The Illusion of Protection
A case gives you false confidence. You stop thinking about the damage. You forget it exists. Meanwhile, corrosion spreads, structural integrity weakens, and repair costs increase.
What could have been a simple back glass replacement becomes a motherboard repair. What started as a $100 fix becomes a $400 problem or a total loss.
The Smart Approach
Get the repair done first, then protect your phone with a quality case. You’ll have genuine protection backed by actual structural integrity, not cosmetic concealment of an active problem.
Take Action Before Hidden Costs Multiply
That cracked back glass is actively damaging your phone right now. Every Houston rainstorm, every humid afternoon, every workout session increases the risk.
Professional laser repair is faster, safer, and more affordable than most people expect. You’ll restore wireless charging, protect your phone from moisture, preserve your trade-in value, and eliminate the hidden costs of pretending the damage doesn’t matter.
Don’t let a cracked back glass become a dead phone. The fix is simpler than you think when you choose the right repair method and act before the damage spreads.
Every summer, repair technicians across the United States witness a surge in one particular issue: iPhone swollen batteries. Affectionately nicknamed “spicy pillows” in tech communities, these bloated power cells represent more than an inconvenience; they constitute a genuine fire and explosion hazard.
If you’ve noticed your iPhone screen lifting, the device feeling thicker, or your phone rocking on flat surfaces, you may be dealing with a swollen battery. This comprehensive guide explains why summer heat accelerates battery degradation, how to identify warning signs, and what steps to take when your iPhone battery begins to fail.
How 95°F+ Weather Degrades Lithium-Ion Capacity
Lithium-ion batteries operate through chemical reactions that are highly temperature-sensitive. Apple designs iPhones to function optimally between 32°F and 95°F (0°C to 35°C). When ambient temperatures exceed this threshold, the battery’s internal chemistry becomes unstable.
At temperatures above 95°F, several destructive processes occur simultaneously:
Accelerated Electrolyte Decomposition: The liquid electrolyte that enables ion movement between the anode and cathode begins breaking down faster. This decomposition produces gases that accumulate inside the sealed battery pouch.
SEI Layer Degradation: The Solid Electrolyte Interphase, a protective film on the battery’s anode, deteriorates in heat. Each degradation cycle consumes lithium ions permanently, reducing overall capacity.
Thermal Runaway Risk: In extreme cases, sustained heat exposure can trigger thermal runaway, where the battery generates more heat than it can dissipate, potentially resulting in fire or explosion.
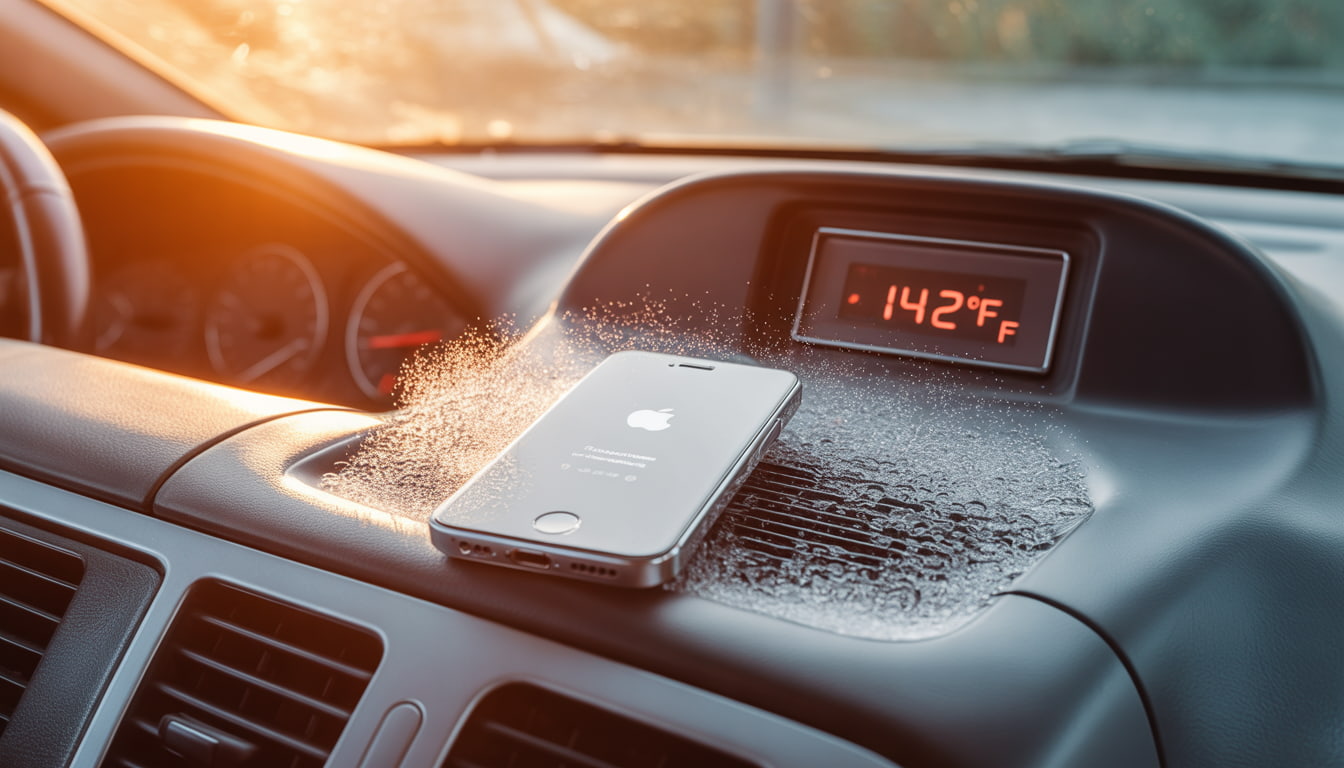
Research indicates that storing lithium-ion batteries at 104°F (40°C) for extended periods can reduce capacity by 15-35% within a single year. For iPhone users in states like Arizona, Texas, Florida, and Nevada, leaving devices in parked cars during summer months where interior temperatures can exceed 140°F dramatically shortens battery lifespan.
The formation of internal gases is what transforms a flat battery cell into the characteristic pillow shape. This swelling places pressure on internal iPhone components, eventually pushing the display away from the frame.
How to Read Your iPhone Battery Settings Like a Pro
Apple provides diagnostic tools that help users monitor battery health before problems become visible. Navigate to Settings > Battery > Battery Health & Charging to access critical information.
Maximum Capacity: This percentage indicates your battery’s current capacity relative to when it was new. A reading of 85% means your battery holds 85% of its original charge. Apple considers batteries with 80% or higher capacity to be operating normally.
Peak Performance Capability: This section reveals whether iOS has implemented performance throttling. Messages indicating “normal” peak performance mean no throttling is active. Any variation from this message warrants attention.
Cycle Count (accessible via Settings > General > About on iOS 17.4+): Each full discharge and recharge constitutes one cycle. Apple rates iPhone batteries for approximately 500 complete cycles before reaching 80% capacity, though newer models with improved chemistry may exceed this.
Charging Optimization Status: Verify that “Optimized Battery Charging” is enabled. This feature learns your charging habits and delays charging past 80% until you need your phone, reducing stress on the battery.
Monitor these metrics monthly during summer months. Rapid capacity drops particularly losses exceeding 5% within a single month may indicate heat damage or imminent swelling.
Why Apple Intentionally Slows Down Phones with Old Batteries
In 2017, Apple confirmed what many users suspected: iOS throttles processor speeds on iPhones with degraded batteries. This practice, initially implemented without user notification, sparked significant controversy and resulted in a $113 million settlement across multiple states.
The technical justification is legitimate. As batteries age, their internal resistance increases.
When high-performance tasks demand significant current draw, degraded batteries may struggle to maintain adequate voltage. This voltage sag can cause unexpected shutdowns a problem that affected many iPhone 6 and 6s users.
Apple’s solution was to dynamically limit peak CPU and GPU performance when the battery cannot reliably supply demanded power. While this prevents shutdowns, it manifests as:
Slower application launch times
Reduced frame rates during graphics-intensive tasks
Longer processing times for photos and videos
Dimmed display brightness in some scenarios
Following user backlash, Apple now provides transparency through the Battery Health menu. If you see the message “Performance management has been applied,” your device is being throttled due to battery degradation. iOS allows users to disable this feature, though doing so risks unexpected shutdowns.
For iPhones with swollen batteries, throttling often precedes visible swelling. If performance degradation coincides with summer months and your phone is two or more years old, battery inspection is advisable.
iPhone Swollen Batteries: Recognizing Screen Lifting as a Fire Hazard
The most visible indicator of iPhone swollen batteries is display separation. As gases accumulate within the battery pouch, internal pressure increases until the weakest structural point yields typically the adhesive bonding the screen to the frame.
Perform these physical inspections regularly:
The Flat Surface Test: Place your iPhone on a hard, flat surface. Press each corner gently. If the phone rocks or feels unstable, the frame may be warping due to battery expansion.
Visual Inspection: Examine the seam between the display and aluminum frame from multiple angles under good lighting. Any visible gap, particularly near the bottom of the device (where iPhone batteries are located), indicates potential swelling.
Tactile Check: Run your fingernail along the display edge. Separation should be imperceptible on a healthy device.
Caution: If you confirm swelling, do not attempt to puncture, compress, or heat the device. Punctured lithium-ion batteries can release toxic fumes and ignite. Place the device in a fireproof container or on a non-flammable surface away from combustibles and contact a qualified repair technician immediately.
The Consumer Product Safety Commission recommends treating swollen batteries as hazardous materials. Do not place swollen devices in regular trash. Most Apple Stores and authorized service providers accept damaged batteries for proper recycling.
Aftermarket vs. OEM Quality: Understanding the Difference in Replacement Parts
When replacing iPhone swollen batteries, consumers face a choice between Apple’s official service and third-party repair providers using aftermarket components. Understanding the differences helps inform this decision.
OEM (Original Equipment Manufacturer) Batteries:
Manufactured to Apple’s specifications
Include proper battery management system integration
Maintain accurate Battery Health readings in iOS
Carry Apple’s warranty coverage
Cost more ($89-$119 through Apple for most models)
Aftermarket Batteries:
Quality varies dramatically by supplier
May use recycled or inferior cells
Often trigger “Unable to verify” warnings in iOS
May not communicate accurately with iOS battery management
Typically cost $30-$60 through independent repair shops
Apple implemented software-based authentication starting with the iPhone XS and XR.
Non-authenticated batteries display a “Service” message in Battery Health regardless of actual condition, and accurate capacity reporting is disabled.
However, this doesn’t mean all aftermarket options are inferior. High-quality third-party batteries using genuine cells can perform comparably to OEM components. The challenge lies in identifying reputable suppliers. Request information about cell origin and capacity ratings before authorizing replacement.
For devices still under AppleCare+ coverage, Apple replacement represents the logical choice. For older devices outside warranty, aftermarket batteries from established repair shops with strong reviews offer reasonable value.
Calibration Tips: How to Treat Your New Battery for Maximum Lifespan
After battery replacement, proper calibration and usage habits significantly impact longevity.
Follow these evidence-based practices:
Initial Calibration Cycle: Allow the new battery to discharge to approximately 5-10%, then charge uninterrupted to 100%. Leave connected for an additional hour after reaching full charge. This process helps iOS accurately gauge the battery’s true capacity.
Ongoing Maintenance:
Maintain charge levels between 20-80% during daily use when possible
Avoid overnight charging on surfaces that trap heat (beds, couches)
Remove cases during extended charging sessions to improve heat dissipation
Enable “Optimized Battery Charging” to reduce time spent at 100%
Avoid using the device while charging, particularly during resource-intensive tasks
Environmental Precautions:
Never leave your iPhone in vehicles during summer months
Avoid direct sunlight exposure during outdoor use
If the device displays a temperature warning, power it off and allow cooling before resuming use
Store devices in climate-controlled environments during extreme weather
Charging Equipment: Use Apple-certified cables and adapters. Non-certified chargers may deliver inconsistent voltage that stresses battery chemistry. MFi certification indicates compliance with Apple’s standards.
Following these practices can extend battery service life by 12-24 months compared to careless usage patterns.
Conclusion
iPhone swollen batteries represent a predictable failure mode that summer heat accelerates substantially. By monitoring battery health metrics, recognizing physical warning signs, and responding appropriately when swelling occurs, you can protect both your device and your safety.
If you discover a swollen battery in your iPhone, avoid delays. The same chemical instability causing the swelling creates fire risk that increases over time. Seek professional replacement promptly and follow calibration best practices to maximize the lifespan of your new battery.


 Battery drains quickly but phone otherwise works
 Water damage with multiple failing systems